Guides - Upgrade a Cluster to a Newer Kubernetes Version
A managed Kubernetes service that enables you to easily control and scale your application’s infrastructure.
Kubernetes releases new software versions and patches on a regular cadence. These updates are integrated into LKE after they are released on upstream Kubernetes, which ensures they are properly tested on the Linode Platform. Customers can manually upgrade the Kubernetes version of their LKE cluster to the one version ahead of their current version. If the cluster is multiple versions behind the latest, multiple upgrades can be performed if desired.
Additionally, Kubernetes versions are also regularly deprecated on LKE. This prevents customers from experiencing issues as a result of using outdated software. When a Kubernetes version is deprecated, an upgrade is scheduled for any LKE clusters using that version. This scheduled update is communicated to all affected customers in advance. Customers can then manually trigger the upgrade or wait until the schedule time to automatically be upgraded. Since these upgrades can remove or change features, make sure you thoroughly review the associated Kubernetes changelogs before upgrading your LKE cluster.
Check the Kubernetes Version on an LKE Cluster
Navigate to the Kubernetes page in the Cloud Manager to see a list of all LKE clusters on your account (see Manage Kubernetes Clusters).


The current Kubernetes version of each LKE cluster is listed within the Version column. If an upgrade is available, an Upgrade button is displayed next to the version number.
Alternatively, if you would like to get the current local version of Kubernetes on your cluster through kubectl, use the following command:
kubectl version | grep ServerWhat Does an Upgrade Look Like
When upgrading a Kubernetes cluster on LKE, it is important to keep in mind that all nodes within the cluster will need to be recycled on a rolling basis. In other words, the nodes within your cluster are taken down and upgraded one at a time, to help ensure that the process completes without downtime.
In the highest level of detail, each node will be independently drained and cordoned one at a time, while the High Availability features of Kubernetes ensure that all workloads are migrated to other nodes. Once a node is drained and cordoned, it is removed and a new node is created using the correct Kubernetes version in it’s place, where it is synced, and then uncordoned, immediately putting it back live into the cluster with the Ready status.
While this process generally doesn’t impact workloads in a significant way, it is strongly recommended that steps are taken to ensure that there is enough space on all nodes to accommodate for this temporary shift in resources. If a cluster of three nodes cannot briefly support the resources demands of an application using only two nodes, then the upgrade process may result in unintended application downtime. For the most comprehensive resource coverage possible, we recommend enabling the Cluster Autoscaler, or resizing your node pools to something larger as needed.
Review the Kubernetes Changelog
Changelogs for each new version of Kubernetes are published on the Kubernetes CHANGELOG page on GitHub. To ensure a clean upgrade and eliminate potential issues, review the changelog entry that corresponds with the Kubernetes version to which your cluster will be upgraded. Since LKE clusters can only be upgraded one minor version at a time (i.e. v1.24.x to v1.25.x), you only need to review a single changelog entry.
Each Kubernetes changelog entry includes patch versions and apha/development versions. It’s recommended that you review every section titled Changelog since vX.Y.Z starting from your current Kubernetes version and continuing through the latest patch release for the version to which you’ll be upgraded. Compare these changes with the components and configuration of your cluster to help identify any breaking changes or issues that may occur. Additionally, review any upgrade notes, known issues, deprecation notes, or API changes, all of which may appear alongside each changelog.
The Kubernetes Blog may also include a post regarding changes in each version (such as the Kubernetes Removals and Major Changes In 1.25 post). These blog posts may be less detailed, but should be easier to understand so you can quickly identify major changes.
As API changes are an issue that can commonly go unnoticed when upgrading LKE, we additionally recommend checking Kubernetes’ API deprecation guide for more information on API changes, and how they should be addressed in specific circumstances.
Search for Compatibility Issues with Popeye
One way to identify breaking changes and compatibility issues with Kubernetes upgrades is to use the Popeye tool. For help with this process, see the Use Popeye to Check for Kubernetes Configuration Issues guide.
Upgrade Kubernetes on an LKE Cluster
Navigate to the Kubernetes page in the Cloud Manager to see a list of all LKE clusters on your account (see Manage Kubernetes Clusters).
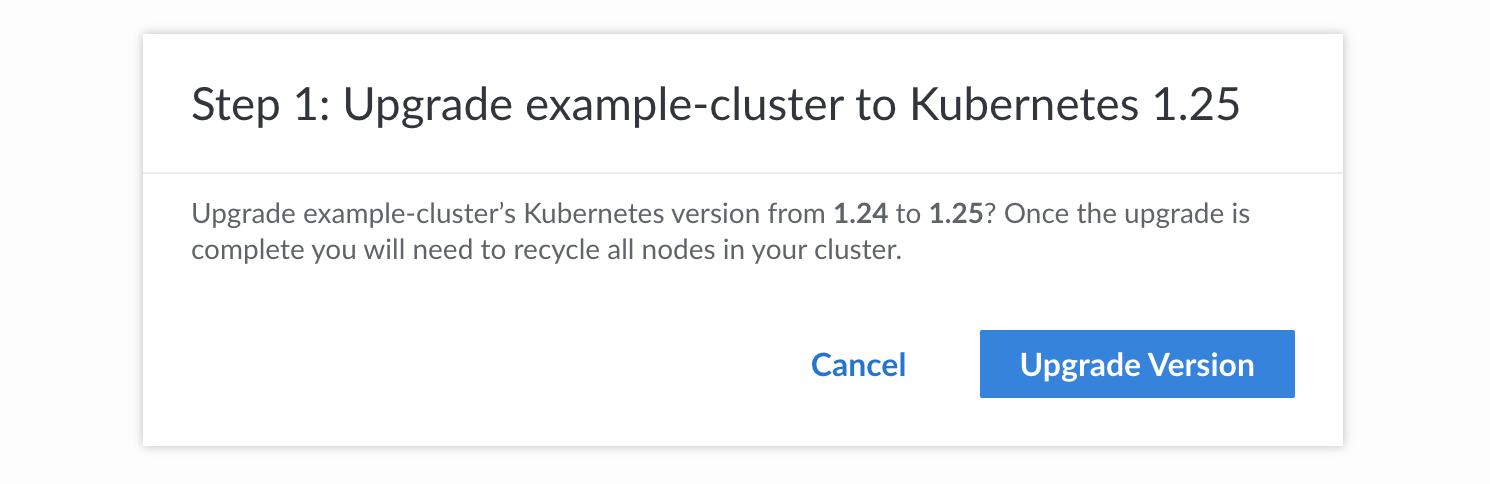
Locate the cluster you wish to upgrade and click the corresponding Upgrade button in the Version column. This button only appears if there is an available upgrade for that cluster.


A confirmation popup should appear notifying you of the current and target Kubernetes version. Click the Upgrade Verion button to continue with the upgrade.


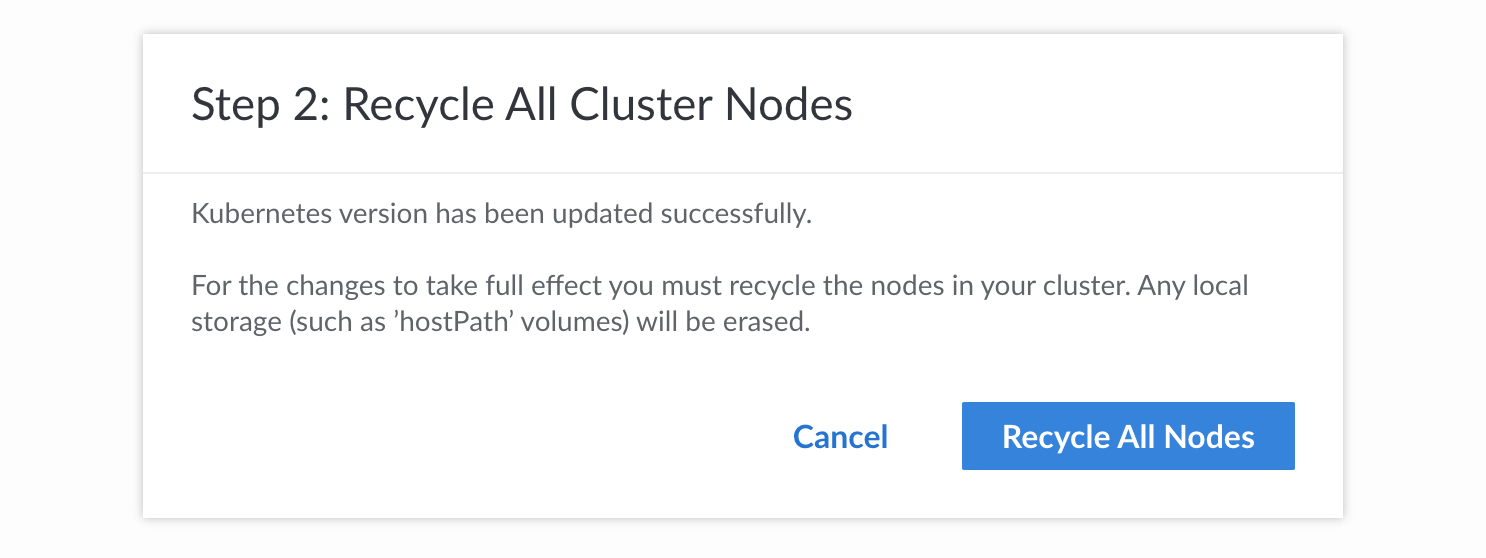
Once the upgrade is complete (which should be nearly instantly), the next step is to recycle all nodes in the cluster so that they are they use the newer Kubernetes version. A second popup should automatically appear requesting that you start this process. Click the Recycle All Nodes button. Nodes are recycled on a rolling basis so that only one node is down at a time.


More Information
You may wish to consult the following resources for additional information on this topic. While these are provided in the hope that they will be useful, please note that we cannot vouch for the accuracy or timeliness of externally hosted materials.
This page was originally published on